

In this article, we'd be configuring the various layers of our Security. We'll start with Authentication. This will include a service to generate and validate tokens for a particular user instance , and an Application Configuration class to customize the beans necessary for our Security.
Why are we customizing our Beans?
In Spring, beans are the objects that form the backbone of your application. They are managed by the Spring IoC container.
The need to customize them will often time come up in our projects. In our case, we will be customizing and creating our beans to suit our usage. That which is JWT implementation. Recall that we implemented Userdetails in our User entity.
package project.entity
import jakarta.persistence.*;
import jakarta.validation.constraints.Email;
import lombok.Data;
import lombok.NonNull;
import lombok.RequiredArgsConstructor;
import org.springframework.security.core.GrantedAuthority;
import org.springframework.security.core.userdetails.UserDetails;

import java.time.LocalDate;
import java.util.Collection;

@RequiredArgsConstructor
@Entity
@Data
@Table(name = "users")
public class User implements UserDetails {
    @Id
    @GeneratedValue(strategy = GenerationType.AUTO)
    ...
    ...
So we would not be writing any extra lines of codes. Thanks to Object-Oriented-Programming!
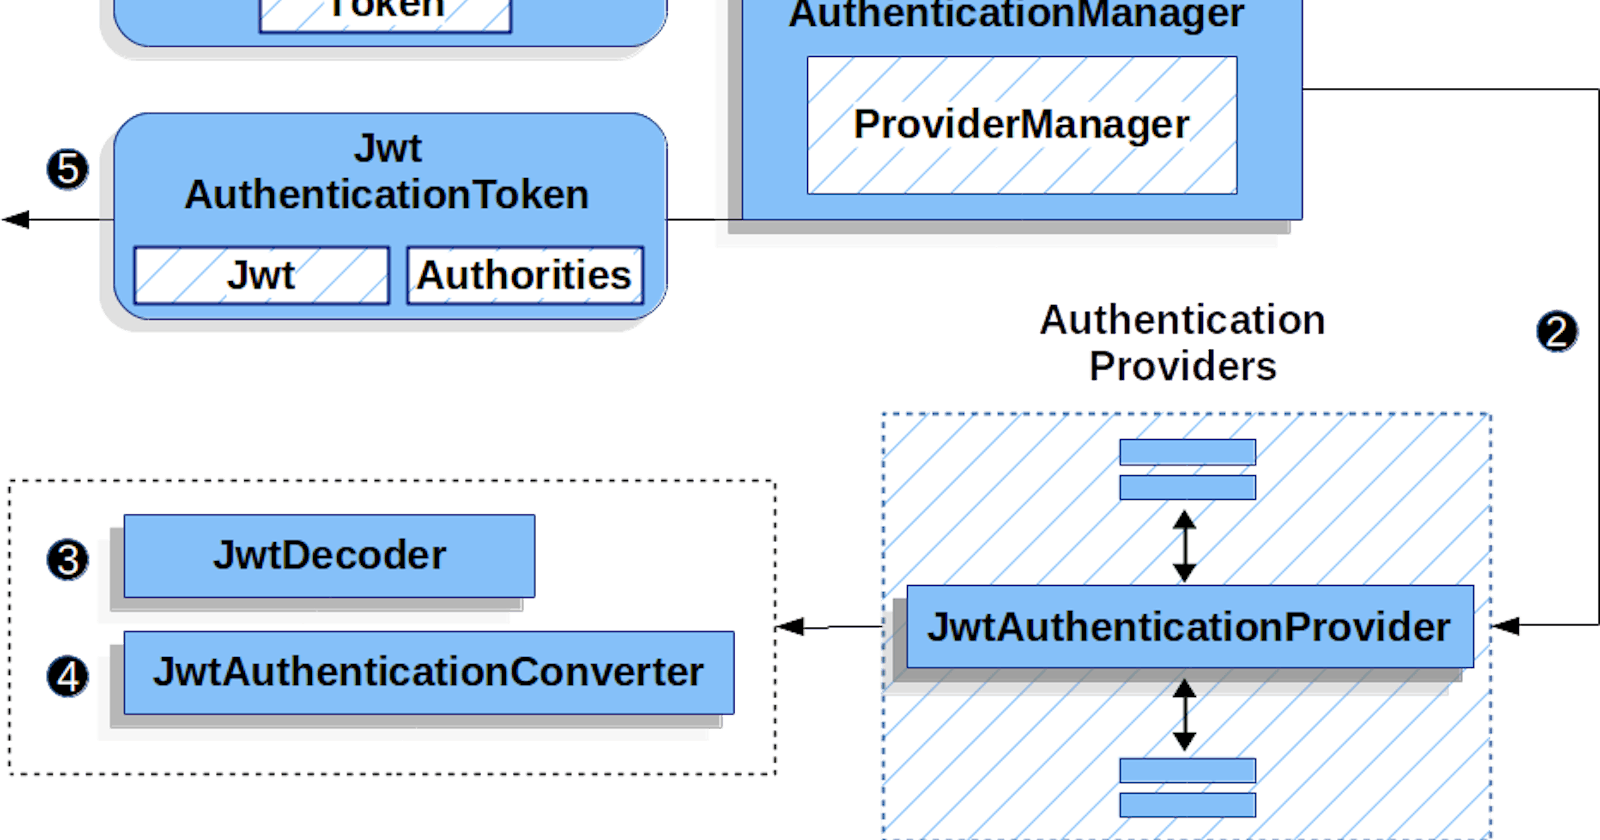
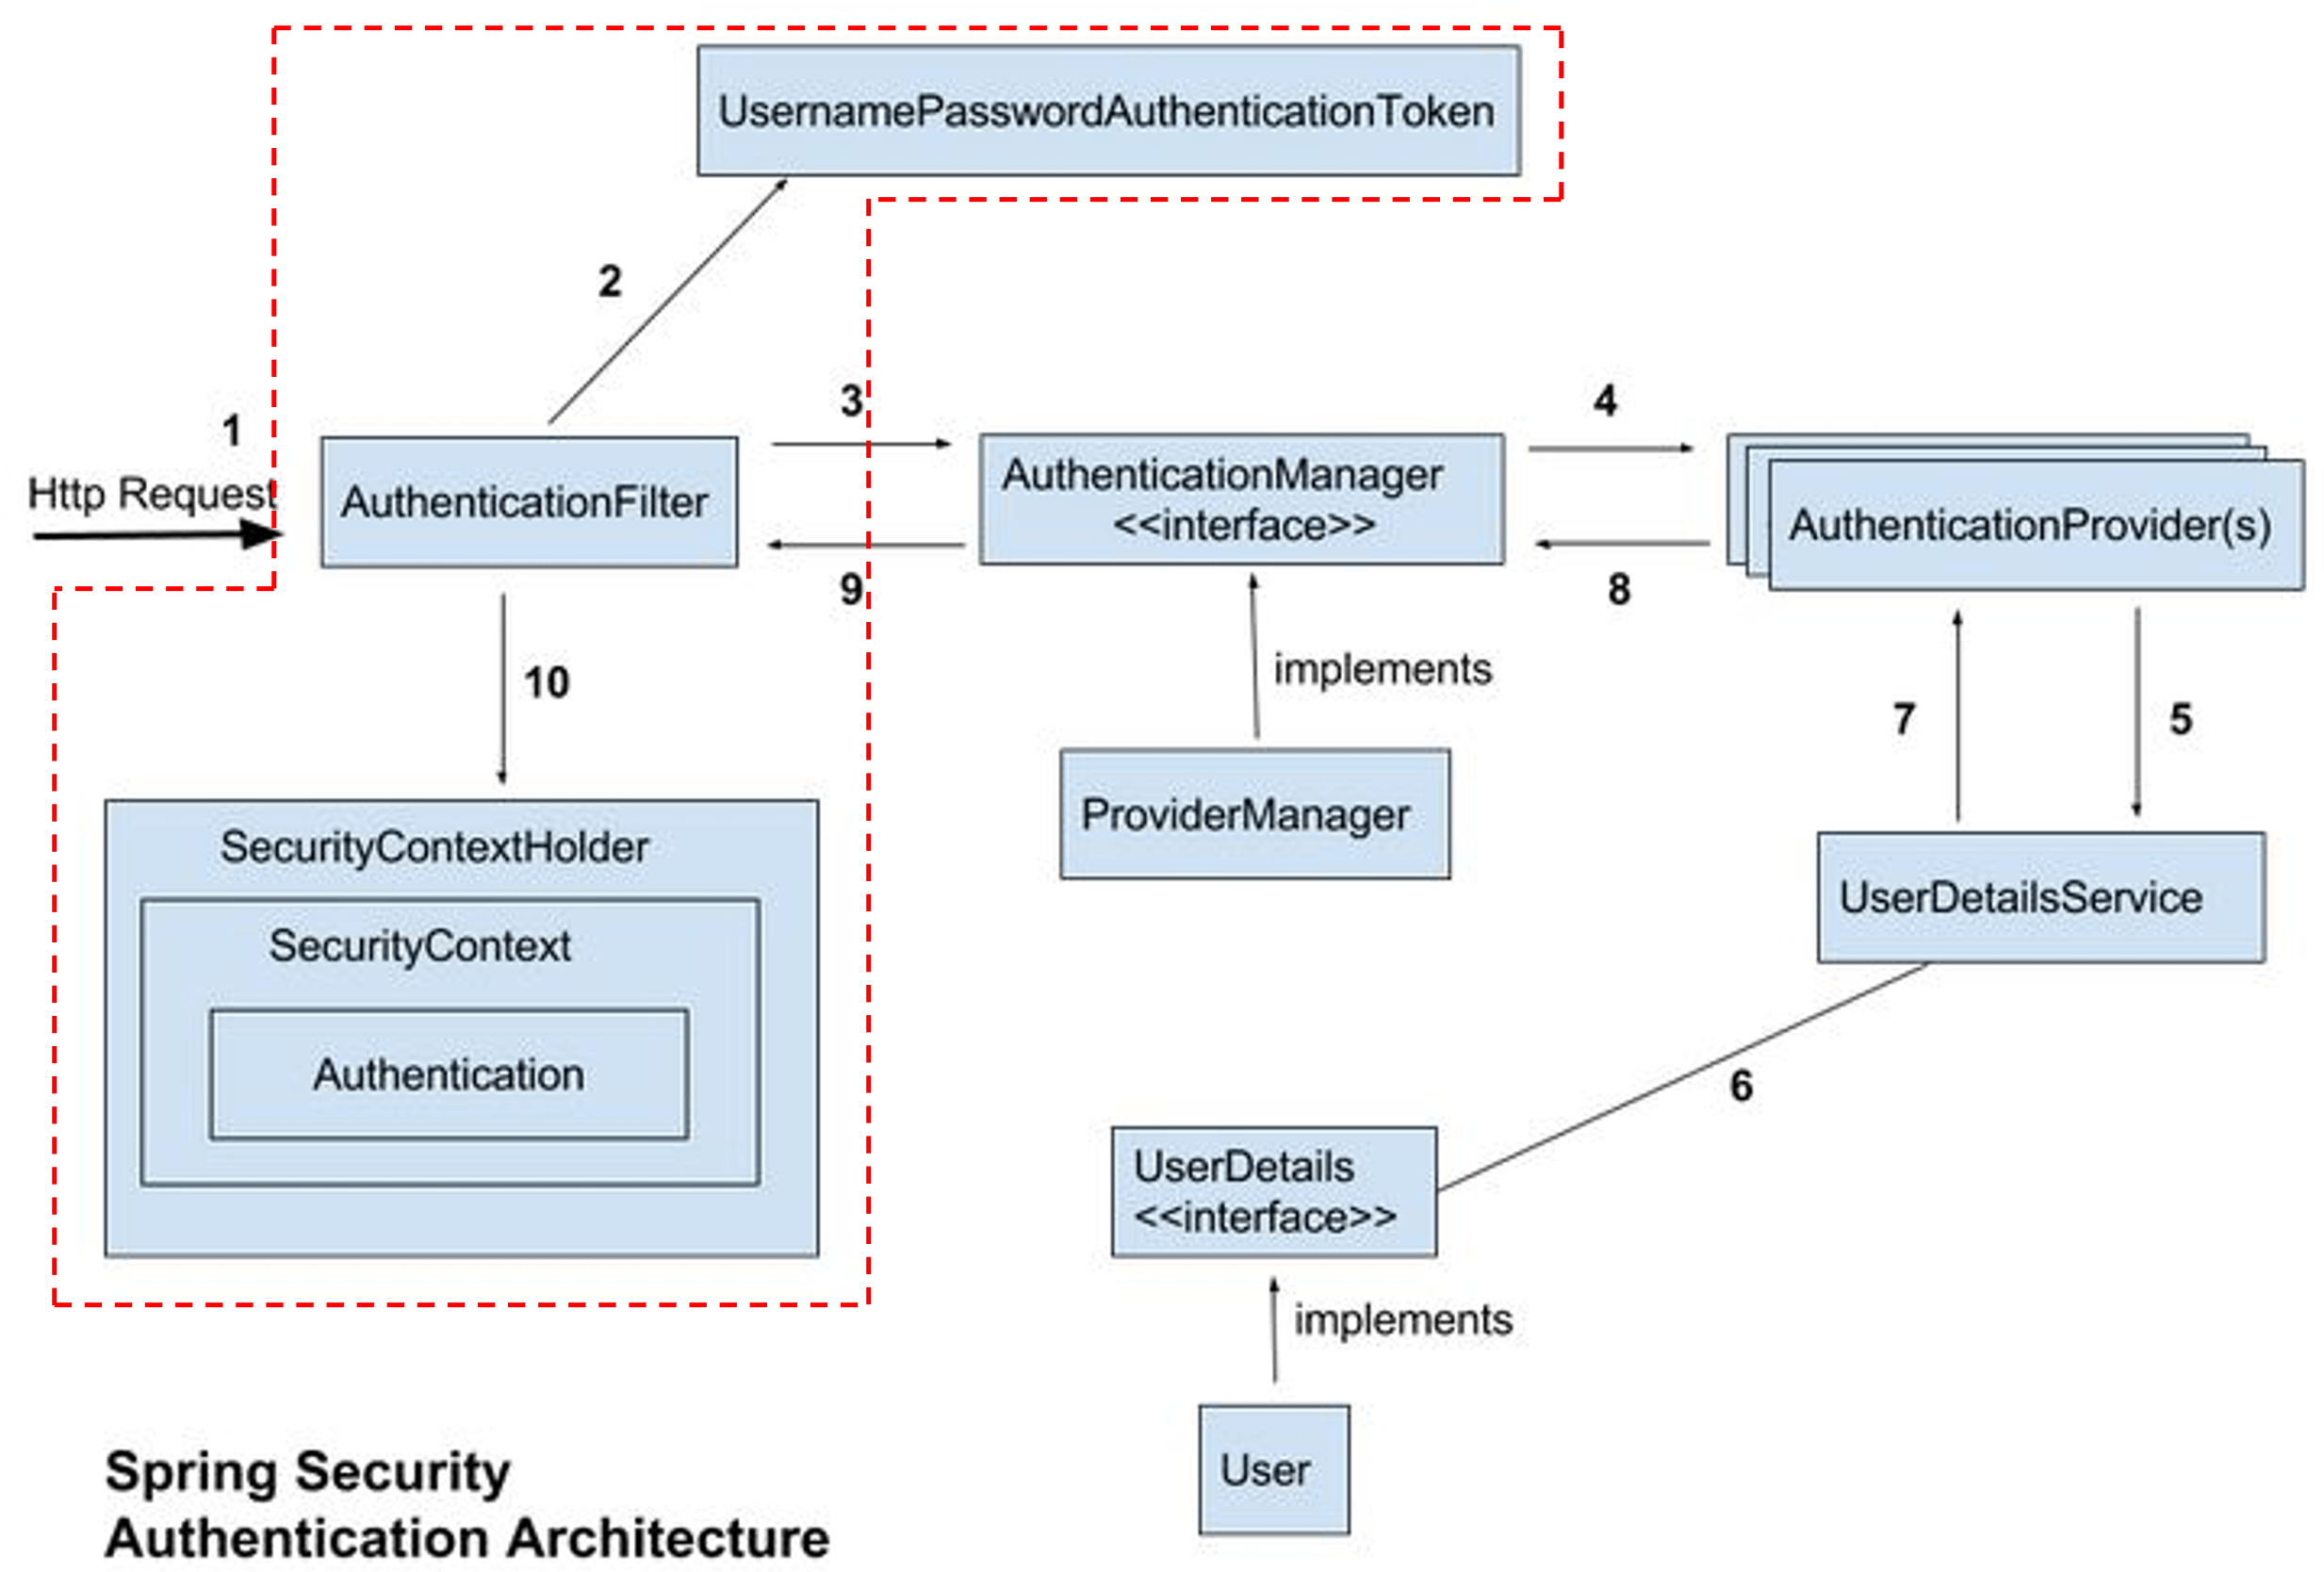
Authentication
Authentication is the process of verifying the identity of a user or entity who is attempting to access a system or resource, ensuring that only authorized individuals can gain access.
The key steps involved in authentication often involve:
Presentation of credentials: The user provides information to prove their identity.Could be a username and password, a fingerprint, a security token, or a one-time code.
Validation : The system compares the provided credentials with stored information to verify their authenticity.
Authorization: If authentication is successful, the system grants the user access to the requested resources or actions based on their assigned permissions.
Let's see how this is done.
Jwt.java
package project.configs;


import io.jsonwebtoken.Claims;
import io.jsonwebtoken.Jwts;
import io.jsonwebtoken.SignatureAlgorithm;
import io.jsonwebtoken.io.Decoders;
import io.jsonwebtoken.security.Keys;
import org.springframework.security.core.userdetails.UserDetails;
import org.springframework.stereotype.Service;


import java.security.Key;
import java.util.Date;
import java.util.HashMap;
import java.util.Map;
import java.util.function.Function;

@Service
public class Jwt {

    private static final String SECRET_KEY = "YOUR_SECRET_KEY";

    public String extractUsername(String token) {
        return extractClaim(token, Claims::getSubject);
    }

    public <T> T extractClaim(String token, Function<Claims, T> claimsResolver) {
        final Claims claims = extractAllClaims(token);
        return claimsResolver.apply(claims);
    }

    public String generateToken(UserDetails userDetails) {
        return generateToken(new HashMap<>(), userDetails);
    }

    public String generateToken(
            Map<String, Object> extraClaims,
            UserDetails userDetails
    ) {
        return Jwts
                .builder()
                .setClaims(extraClaims)
                .setSubject(userDetails.getUsername())
                .setIssuedAt(new Date(System.currentTimeMillis()))
                .setExpiration(new Date(System.currentTimeMillis() + 10000 * 60 * 250))
                .signWith(getSignInKey(), SignatureAlgorithm.HS256)
                .compact();
    }

    public boolean isTokenValid(String token, UserDetails user) {
        final String username = extractUsername(token);
        return (username.equals(user.getUsername())) && !isTokenExpired(token);
    }

    private boolean isTokenExpired(String token) throws TokenExpiredException {
            return extractExpiration(token).before(new Date());


    }

    private Date extractExpiration(String token) {
        return extractClaim(token, Claims::getExpiration);
    }

    private Claims extractAllClaims(String token) {
        return Jwts
                .parserBuilder()
                .setSigningKey(getSignInKey())
                .build()
                .parseClaimsJws(token)
                .getBody();
    }

    private Key getSignInKey() {
        byte[] keyBytes = Decoders.BASE64.decode(SECRET_KEY);
        return Keys.hmacShaKeyFor(keyBytes);
    }
}
Straightforward as it is, there's a lot going on in this @ Service above. We have a SECRET_KEY used in decoding the signature of our token.
"YOUR_SECRET_KEY" can be generated here..
We set the Claims of our token at the point of creation, with other attributes such as IssuedDate, ExpiryDate, Subject (which is the Username to be authenticated), SignInKey. We also check if our token is valid. Bravo!
Next we do some custom configuration of the beans in charge of providing authentication in our application.
ApplicationConfig.java
package project.configs;


import project.repository.UserRepository;
import lombok.RequiredArgsConstructor;

import org.springframework.beans.factory.annotation.Autowired;
import org.springframework.context.annotation.Bean;
import org.springframework.context.annotation.Configuration;
import org.springframework.security.authentication.AuthenticationManager;
import org.springframework.security.authentication.AuthenticationProvider;
import org.springframework.security.authentication.dao.DaoAuthenticationProvider;
import org.springframework.security.config.annotation.authentication.configuration.AuthenticationConfiguration;
import org.springframework.security.core.userdetails.UserDetailsService;
import org.springframework.security.core.userdetails.UsernameNotFoundException;
import org.springframework.security.crypto.bcrypt.BCryptPasswordEncoder;
import org.springframework.security.crypto.password.PasswordEncoder;

@Configuration
@RequiredArgsConstructor
public class ApplicationConfig {

    @Autowired
    private final UserRepository repository;

    @Bean
    public UserDetailsService userDetailsService() {
        return username -> repository.findByEmail(username)
                .orElseThrow(() -> new UsernameNotFoundException("User not found"));
    }

    @Bean
    public AuthenticationProvider authenticationProvider() {
        DaoAuthenticationProvider authProvider = new DaoAuthenticationProvider();
        authProvider.setUserDetailsService(userDetailsService());
        authProvider.setPasswordEncoder(passwordEncoder());
        return authProvider;
    }

    @Bean
    public AuthenticationManager authenticationManager(AuthenticationConfiguration config) throws Exception {
        return config.getAuthenticationManager();
    }

    @Bean
    public PasswordEncoder passwordEncoder() {
        return new BCryptPasswordEncoder();
    }

}
What is happening in our @ Configuration above?
We make use of BCryptPasswordEncoder kind of password encoder, so the bean for it. We create a UserDetailsService bean as well, which implements UserDetails (just like our User entity.) So the ease.
Then finally, we create our AuthenticationProvider bean. We call a new DaoAuthenticationProvider constructor and thus set the UserDetailsService and PasswodEncoder to the ones we customize. Easy-peasy!
Let's move on to configuring our routers for cross-origin authorization and customizing our authentication filter.
Authentication Filter
In web applications, an authentication filter acts as a gatekeeper, intercepting incoming requests and ensuring that only authenticated users can access protected resources. It's a crucial component of application security, enforcing access control policies.
Check out the implementation in the next article...