

Introduction
The evolution of Software creation from Idealization to Actualization can most times be a tedious one. The mapping of entities to attributes, implementation of attributes as form of authentication , down to authorization via roles or authorities (as in Spring Boot Applications.) All these, pointing to one thing which is Security.
Security, however has been seen as the inevitable component in any Software creation process. It is layered in Authentication, Authorization, Encryption ,Validation and many more such as Logging-and-Monitoring and the likes (may not be accordingly.)
Indeed, Security is very vital in any modern application.
In this article we'll be customizing our Spring Rest application to make use of JWT (JSON Web Token) as form of authentication.
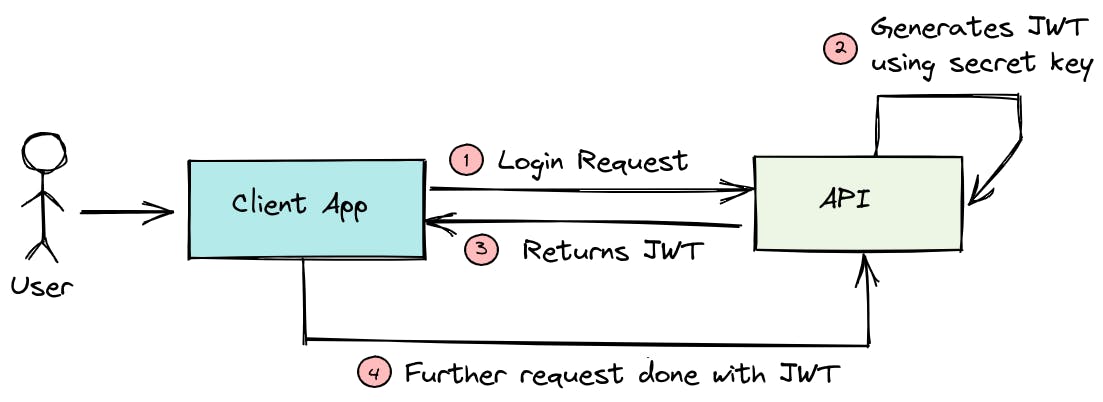
The technology is a widely used one, and implements the First 4(four) layers of Security we mentioned above. This article has been curated to guide use through the implementation of these layers in our Spring project and in the configuration as well.
Project Overview
Our application should most definitely have a User entity to store our users' details but first of, we'd be adding all the dependencies we'll be needing in this project and state their importance.
We are assuming this is a Maven Project our dependencies will be in our pom.xml file. Tweaks for other project types (i.e Gradle/Kotlin) should not require too many code changes. ...Check here.
<dependencies>
        <dependency>
            <groupId>org.springframework.boot</groupId>
            <artifactId>spring-boot-starter-data-jpa</artifactId>
        </dependency>
        <dependency>
            <groupId>org.springframework.boot</groupId>
            <artifactId>spring-boot-starter-web</artifactId>
        </dependency>
        <dependency>
            <groupId>org.springframework.boot</groupId>
            <artifactId>spring-boot-starter-security</artifactId>
        </dependency>
spring-boot-starter-data-jpa: Provides core JPA functionality for interacting with databases.
spring-boot-starter-web: Enables web development with Spring MVC, Tomcat, and other web-related features.
spring-boot-starter-security: Provides core Spring Security features for authentication and authorization.
        ...
         <dependency>
            <groupId>io.jsonwebtoken</groupId>
            <artifactId>jjwt-api</artifactId>
            <version>0.11.5</version>
        </dependency>
        <dependency>
            <groupId>io.jsonwebtoken</groupId>
            <artifactId>jjwt-impl</artifactId>
            <version>0.11.5</version>
        </dependency>
        <dependency>
            <groupId>io.jsonwebtoken</groupId>
            <artifactId>jjwt-jackson</artifactId>
            <version>0.11.5</version>
        </dependency>
- jjwt-api, jjwt-impl, jjwt-jackson: Allow for creating and using JSON Web Tokens for authentication and authorization purposes.
        ...
        <dependency>
            <groupId>org.projectlombok</groupId>
            <artifactId>lombok</artifactId>
        </dependency>
lombok: Reduces boilerplate code with annotations for getters, setters, constructors, etc.
We now have our dependencies loaded into the project. Let's delve further into our project structure.
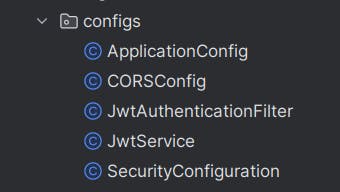
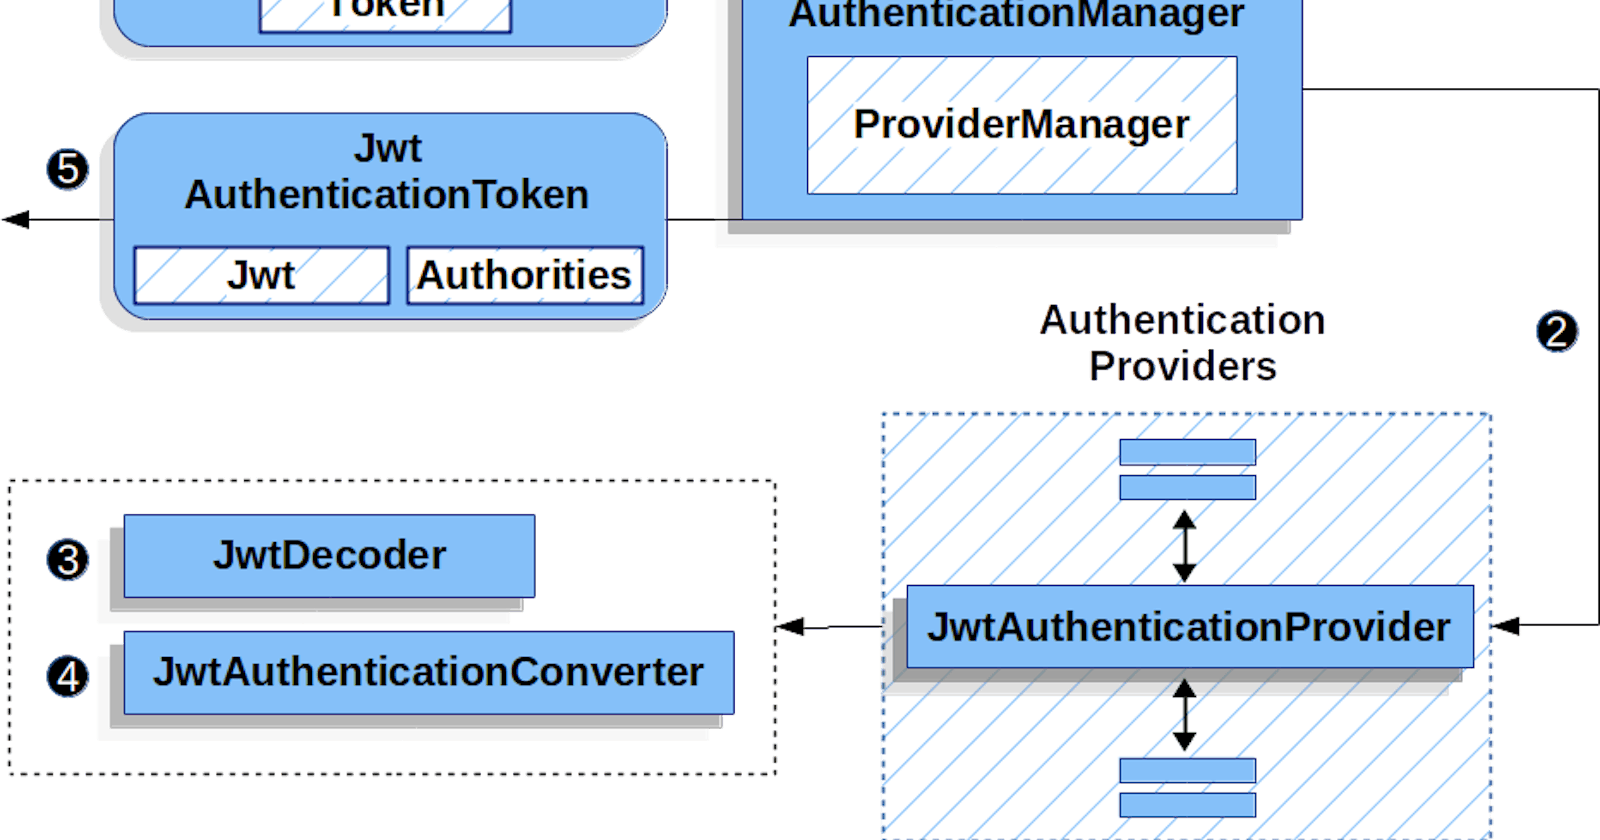
We would be having 5 classes in our configs (configuration) package. Next is our entity and repository classes.
User.java
package project.entity
import jakarta.persistence.*;
import jakarta.validation.constraints.Email;
import lombok.Data;
import lombok.NonNull;
import lombok.RequiredArgsConstructor;
import org.springframework.security.core.GrantedAuthority;
import org.springframework.security.core.userdetails.UserDetails;

import java.time.LocalDate;
import java.util.Collection;

@RequiredArgsConstructor
@Entity
@Data
@Table(name = "users")
public class User implements UserDetails {
    @Id
    @GeneratedValue(strategy = GenerationType.AUTO)
    private Long id;

    @Column(nullable = false, unique = true)
    @Email
    private String email;

    @Column(nullable = false)
    private String password;


    @Column(name = "enabled")
    public boolean enabled;

     @Override
    public Collection<? extends GrantedAuthority> getAuthorities() {
        return null;
    }
    @Override
    public String getUsername() {
        return email;
    }

    @Override
    public String getPassword(){
        return password;
    }


    @Override
    public boolean isAccountNonExpired() {
        return false;
    }

    @Override
    public boolean isAccountNonLocked() {
        return false;
    }

    @Override
    public boolean isCredentialsNonExpired() {
        return false;
    }

    @Override
    public boolean isEnabled() {

        return enabled;
    }


}
What we have above is our User entity which will be saved in our database. It includes password and email field which would be further needed in our authentication implementation. We have decided to implement Userdetails which provides core user information. For more...
UserRepository.java
package project.repository;

import project.entity.User;
import org.springframework.data.jpa.repository.JpaRepository;
import org.springframework.stereotype.Repository;

import java.util.List;
import java.util.Optional;


@Repository
public interface UserRepository extends JpaRepository<User, Long> {
    Optional<User> findByEmail(String email);
Congrats. You're almost there. Let's now do some configurations in the next part of the series here..